Title

Home Canning Low-acid Vegetables

(FN173, Reviewed April 2024)
Summary

The method used for canning a product is determined primarily by the acidity of the food or mixture of foods being canned. Low-acid foods must be processed in a pressure canner to be free of botulism risks.

Lead Author
Lead Author:
Julie Garden-Robinson, Ph.D., R.D., L.R.D., Food and Nutrition Specialist, NDSU Extension
Availability
Availability:
Web only
Publication Sections
Canned Carrots

The method used for canning a product is determined primarily by the acidity of the food or mixture of foods being canned. Low-acid foods must be processed in a pressure canner to be free of botulism risks.

Pressure does not destroy microorganisms, but high temperatures applied for an adequate period of time do kill microorganisms. Successfully destroying all microorganisms capable of growing in canned food is based on the temperature obtained in pure steam, free of air, at sea level. At sea level, a canner operated at a gauge pressure of 10 pounds provides an internal temperature of 240 degrees Fahrenheit.

All fresh vegetables except for most tomatoes are low-acid foods. Most mixtures of low-acid and acidic foods also are low-acid products unless their recipes include enough lemon juice, citric acid or vinegar to make them acidic foods. Other low-acid foods are red meats, seafood, poultry and milk.


General Canning Procedures

Jars and Lids

Use Mason-type canning jars no larger than what is recommended for the specific food being canned. Use two-piece, self-sealing lids. Buy only the quantity of lids that will be used in a year and follow the manufacturer’s directions for preparing the lids.

After filling jars with food, release air bubbles by inserting a flat plastic (not metal) spatula between the food and the inside surface of the jar. Slowly turn the jar and move the spatula up and down to allow air bubbles to escape. Salt may be added if desired. In vegetables, salt seasons the food but is not necessary to ensure their safety. Add salt substitutes, if desired, when serving. Adjust the head space and then clean the jar rim (sealing surface) with a dampened paper towel. Place the lid, gasket down, onto the cleaned jar-sealing surface. Uncleaned jar-sealing surfaces may cause seal failures.

Next fit the metal screw band over the flat lid. To obtain a proper seal, closely follow the manufacturer’s guidelines enclosed with or on the box for tightening the jar lids properly.

The Pressure Canner

Two serious errors in temperatures obtained in pressure canners occur because:

  1. Internal canner temperatures are lower at higher altitudes. To correct this error, canners must be operated at the increased pressures specified in this publication for appropriate altitude ranges.
  2. Air trapped in a canner lowers the temperature obtained at 5, 10 or 15 pounds of pressure and results in underprocessing. The highest volume of air trapped in a canner occurs in processing raw-packed foods in dial-gauge canners. These canners do not vent air during processing. To be safe, all types of pressure canners must be vented 10 minutes before they are pressurized.

To vent a canner, leave the vent port uncovered on newer models or manually open petcocks on some older models. Heating the filled canner with its lid locked into place boils water and generates steam that escapes through the petcock or vent port. When steam first escapes, set a timer for 10 minutes. After venting 10 minutes, close the petcock or place the counterweight or weighted gauge over the vent port to pressurize the canner.

Weighted-gauge models exhaust tiny amounts of air and steam each time their gauge rocks or jiggles during processing. They control pressure precisely and neither need watching during processing nor checking for accuracy. The sound of the weight rocking or jiggling indicates that the canner is maintaining the recommended pressure. The single disadvantage of weighted-gauge canners is that they cannot correct precisely for higher altitudes. At altitudes above 1,000 feet, they must be operated at canner pressures of 10 instead of 5 or 15 instead of 10 pounds per square inch (PSI).

Check dial gauges for accuracy before use each year and replace the gauges if they read high or low by more than 2 pounds at 5, 10 or 15 pounds of pressure. Low readings cause overprocessing and may indicate that the accuracy of the gauge is unpredictable. Gauges may be checked at most county offices of the NDSU Extension Service and the SDSU Extension Service.

Handle canner lid gaskets carefully and clean them according to the manufacturer’s directions. Nicked or dried gaskets will allow steam leaks during pressurization of canners. Keep gaskets clean between uses. Gaskets on older model canners may require a light coat of vegetable oil once per year. Gaskets on newer model canners are pre-lubricated and do not benefit from oiling. Check your canner’s instructions if you doubt that the particular gasket you use has been pre-lubricated.

Lid safety fuses are thin metal inserts or rubber plugs designed to relieve excessive pressure from the canner. Do not pick at or scratch fuses while cleaning lids. Use only canners that have the Underwriter’s Laboratory (UL) approval to ensure their safety.

Replacement gauges and other parts for canners often are available at stores offering canning equipment or from canner manufacturers. When ordering parts, give your canner model number and describe the parts needed.

Using Pressure Canners

Follow these steps for successful pressure canning:

  1. Put 2 to 3 inches of hot water in the canner. Place filled jars on the rack, using a jar lifter. Fasten the canner lid securely.
  2. Leave weight off the vent port or open the petcock. Heat at the highest setting until steam flows from the petcock or vent port.
  3. Maintain the high heat setting, exhaust steam 10 minutes and then place weight on the vent port or close the petcock. The canner will pressurize during the next three to five minutes.
  4. Start timing the process when the pressure reading on the dial gauge indicates that the recommended pressure has been reached or when the weighted gauge begins to jiggle or rock.
  5. Regulate the heat under the canner to maintain a steady pressure at or slightly above the correct gauge pressure. Quick and large pressure variations during processing may cause unnecessary liquid losses from the jars. Weighted gauges on Mirro canners should jiggle about two or three times per minute. On Presto canners, they should rock slowly throughout the process.
  6. When the timed process is completed, turn off the heat, remove the canner from the heat if possible and let the canner depressurize. Do not force-cool the canner. Forced cooling may result in food spoilage. Cooling the canner with cold running water or opening the vent port before the canner is fully depressurized will cause loss of liquid from the jars and seal failures. Force-cooling also may warp the canner lid of older model canners, causing steam leaks. Depressurization of older models should be timed. Standard-sized heavy-walled canners require about 30 minutes when loaded with pints and 45 minutes with quarts. Newer thin-walled canners cool more rapidly and are equipped with vent locks. These canners are depressurized when their vent lock piston drops to a normal position.
  7. After the canner is depressurized, remove the weight from the vent port or open the petcock. Wait two minutes, unfasten the lid and remove it carefully. Lift the lid away from you so that the steam does not burn your face.
  8. Remove the jars with a lifter and place them on a towel or cooling rack.

Do not retighten lids after processing jars.

Cooling Jars

Cool the jars at room temperature for 12 to 24 hours. Jars cooled on racks or towels minimize heat damage to counters. The food level and liquid volume of raw-packed jars will be noticeably lower after cooling. Air is exhausted during processing and food shrinks. If a jar loses excessive liquid during processing, do not open it to add more liquid. Check for sealed lids as described below.

Testing Jar Seals

After cooling jars for 12 to 24 hours, remove the screw bands and test seals in one of the following ways:

Option 1: Press the middle of the lid with a finger or thumb. If the lid springs up when you release your finger, the lid is unsealed.

Option 2: Tap the lid with the bottom of a teaspoon. If it makes a dull sound, the lid is not sealed. If food is in contact with the underside of the lid, it also will cause a dull sound. If the jar is sealed correctly, it will make a ringing, high-pitched sound.

Option 3: Hold the jar at eye level and look across the lid. The lid should be concave (curved down slightly in the center). If the center of the lid either is flat or bulging, it may not be sealed.

Reprocessing Unsealed Jars

If a lid fails to seal on a jar, remove the lid and check the jar-sealing surface for tiny nicks. If necessary, change the jar; add a new, properly prepared lid and reprocess within 24 hours using the same processing time. Head space in unsealed jars may be adjusted to 1½ inches and jars could be frozen instead of reprocessed. Foods in single unsealed jars could be stored in the refrigerator and consumed within several days.

Recipes

Asparagus – Spears or Pieces

An average of 3½ pounds per quart

Quality: Use tender, tight-tipped spears, 4 to 6 inches long.

Procedure: Wash asparagus and trim off tough scales. Break off tough stems and wash again. Cut into 1-inch pieces or can whole.

Hot pack — Cover asparagus with boiling water. Boil two or three minutes. Loosely fill jars with hot asparagus, leaving 1 inch of head space.

Raw pack — Fill jars with raw asparagus, packing as tightly as possible without crushing, leaving 1inch of head space.

Add 1 teaspoon of salt per quart to the jars, if desired. Add boiling water, leaving 1 inch of head space. Adjust lids and process according to No. 1 on Table 1 or 2.

Beans or Peas –Shelled, Dried

All varieties

An average of ¾ pound per quart

Quality: Select mature, dry seeds. Sort out and discard discolored seeds.

Procedure: Place dried beans or peas in a large pot and cover with water. Soak 12 to 18 hours in a cool place. Drain water. To quickly hydrate beans, you may cover sorted and washed beans with boiling water in a saucepan. Boil two minutes, remove from heat, soak one hour and drain. Cover beans soaked by either method with fresh water and boil 30 minutes. Add ½ teaspoon of salt per pint or 1 teaspoon per quart to the jar, if desired. Fill jars with beans or peas and cooking water, leaving 1 inch of head space. Adjust the lids and process according to No. 2 on Table 1 or 2.

Beans – Baked

Procedure: Soak and boil beans and prepare molasses sauce according to directions for beans with sauce that follows. Place seven ¾-inch pieces of pork, ham or bacon in an earthenware crock, a large casserole or a pan. Add beans and enough molasses sauce to cover the beans. Cover and bake four to five hours at 350 F. Add water as needed, which is about every hour. Fill jars, leaving 1 inch of head space. Adjust the lids and process according to No. 3 on Table 1.

Beans – Dry, With Tomato or Molasses Sauce

An average of ¾ pound per quart

Quality: Select mature, dry seeds. Sort out and discard discolored seeds.

Procedure: Sort and wash dry beans. Add 3 cups of water for each cup of dried beans or peas. Boil two minutes, remove from heat and soak one hour and drain. Heat to boiling in fresh water and save liquid for making sauce. Make your choice of the following sauces:

Tomato Sauce — Option 1: Mix 1 quart of tomato juice, 3 tablespoons of sugar, 2 teaspoons of salt, 1 tablespoon of chopped onion and ¼ teaspoon each of ground cloves, allspice, mace and cayenne pepper. Heat to boiling. Option 2: Mix 1 cup of tomato ketchup with 3 cups of cooking liquid from the beans. Heat the sauce to boiling.

Molasses Sauce — Mix 4 cups of water or cooking liquid from the beans, 3 tablespoons of dark molasses, 1 tablespoon of vinegar, 2 teaspoons of salt and ¾ teaspoon of powdered dry mustard. Heat to boiling.

Fill jars three-fourths full with hot beans. Add a ¾-inch cube of pork, ham or bacon to each jar, if desired. Fill jars with heated sauce, leaving 1 inch of head space. Adjust the lids and process according to No. 3 on Table 1 or 2.

Beans – Snap and Italian, Pieces

Green and wax

An average of 2 pounds per quart

Quality: Select filled but tender, crisp pods. Remove and discard diseased and rusty pods.

Procedure: Wash beans and trim ends. Leave whole or cut or snap into 1-inch pieces.

Hot pack — Cover with boiling water; boil five minutes. Fill jars loosely, leaving 1 inch of head space.

Raw pack — Fill jars tightly with raw beans, leaving 1 inch of head space. Add 1 teaspoon of salt per quart to the jar, if desired. Add boiling water, leaving 1 inch of head space. Adjust the lids and process according to No. 4 on Table 1 or 2.

Beets – Whole, Cubed or Sliced

An average of 3 pounds per quart

Quality: Beets with a diameter of 1 to 2 inches are preferred for whole packs. Beets larger than 3 inches in diameter are often fibrous.

Procedure: Trim off beet tops, leaving an inch of stem and roots to reduce bleeding of color. Scrub well. Cover with boiling water. Boil until skins slip off easily, about 15 to 25 minutes depending on size. Cool, remove the skins and trim off stems and roots. Leave baby beets whole. Cut medium or large beets into ½-inch cubes or slices. Halve or quarter very large slices. Add 1 teaspoon of salt per quart to the jar, if desired. Fill jars with hot beets and fresh hot water, leaving 1 inch of head space. Adjust the lids and process according to No. 5 on Table 1 or 2.

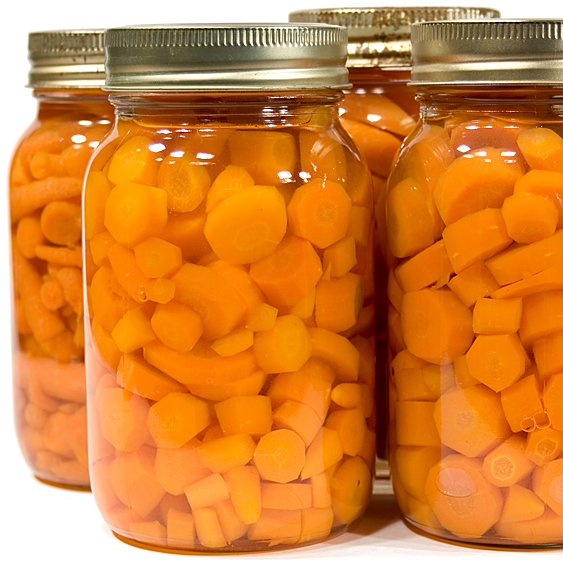
Carrots – Sliced or Diced

An average of 2½ pounds per quart

Quality: Select small carrots, preferably 1 to 1¼ inches in diameter. Larger carrots often are too fibrous.

Procedure: Wash, peel and rewash carrots. Slice or dice.

Hot pack — Cover with boiling water; bring to a boil and simmer for five minutes. Fill jars, leaving 1 inch of head space.

Raw pack — Fill jars tightly with raw carrots, leaving 1 inch of head space.

Add 1 teaspoon of salt per quart to the jar, if desired. Add hot cooking liquid or water, leaving 1 inch of head space. Adjust the lids and process according to No. 6 on Table 1 or 2.

Corn – Cream Style

An average of 2¼ pounds per pint

Quality: Select ears containing slightly immature kernels or kernels of ideal quality for eating fresh.

Procedure: Husk corn, remove silk and wash ears. Blanch ears four minutes in boiling water. Cut corn from cob at about the center of kernel. Scrape remaining corn from cobs with a table knife.

Hot pack — To each quart of corn and scrapings, add 2 cups of boiling water. Heat to boiling. Add ½ teaspoon of salt to each jar, if desired. Fill pint jar with hot corn mixture, leaving 1 inch of head space.

Adjust lids and process according to No. 7 on Table 1 or 2.

Corn - Whole Kernel

An average of 4½ pounds per quart

Quality: Select ears containing slightly immature kernels or kernels of ideal quality for eating fresh. Canning of some sweeter varieties or too immature kernels may cause browning. Can a small amount; check the color and flavor before canning large quantities.

Procedure: Husk the corn, remove the silk and wash. Blanch three minutes in boiling water. Cut corn from the cob at about three-fourths the depth of the kernel.

Caution: Do not scrape the cob. Scraping the cob would make this product too dense to process at the times given.

Hot pack — To each quart of kernels in a saucepan, add 1 cup of hot water, heat to boiling and simmer five minutes. Add 1 teaspoon of salt per quart to the jar, if desired. Fill jars with corn and cooking liquid, leaving 1 inch of head space.

Raw pack — Fill jars with raw kernels, leaving 1 inch of head space. Do not shake or press down. Add 1 teaspoon of salt per quart to the jar, if desired.

Add fresh boiling water, leaving 1 inch of head space. Adjust the lids and process according to No. 8 on Table 1 or 2.

Mixed Vegetables

6 cups sliced carrots

6 cups cut, whole-kernel sweet corn

6 cups cut green beans

6 cups shelled lima beans

4 cups whole or crushed tomatoes

4 cups diced zucchini

Optional mix - You may change the suggested proportions or substitute other favorite vegetables except leafy greens, dried beans, cream-style corn, winter squash and sweet potatoes.

Yield: 7 quarts

Procedure: Except for zucchini, wash and prepare vegetables as described for each vegetable. Wash, trim and slice or cube zucchini; combine all vegetables in a large pot or kettle and add enough water to cover the pieces. Add 1 teaspoon of salt per quart to the jar, if desired. Boil five minutes and fill jars with hot pieces and liquid, leaving 1 inch of head space. Adjust the lids and process according to No. 9 on Table 1 or 2.

Peas, Green – Shelled

An average of 4½ pounds per quart

We recommend that sugar snap and Chinese edible pods be frozen for best quality.

Quality: Select filled pods containing young, tender, sweet seeds. Discard diseased pods.

Procedure: Shell and wash peas. Add 1 teaspoon of salt per quart to the jar, if desired.

Hot pack — Cover with boiling water. Bring to a boil in a saucepan and boil two minutes. Fill jars loosely with hot peas and add cooking liquid, leaving 1 of inch head space.

Raw Pack — Fill jars with raw peas and add boiling water, leaving 1 inch of head space. Do not shake or press down peas. Adjust the lids and process according to No. 10 on Table 1 or 2.

Peppers

An average of 1 pound per pint

Hot or sweet, including chilies, jalapeno and pimiento

Quality: Select firm yellow, green or red peppers. Do not use soft or diseased peppers.

Procedure: Select your favorite pepper(s). Caution: If you choose hot peppers, wear plastic gloves while handling them or wash your hands thoroughly with soap and water before touching your face. Small peppers may be left whole. Large peppers may be quartered. Remove cores and seeds. Slash two or four slits in each pepper and either blanch in boiling water or blister using one of the following methods:

Oven or broiler method: Place peppers in a hot oven (400 F) or broiler for six to eight minutes until skins blister.

Range-top method: Cover a hot burner, either gas or electric, with heavy wire mesh. Place peppers on the burner for several minutes until skins blister.

Allow peppers to cool. Place them in a pan and cover them with a damp cloth. This will make peeling the peppers easier. After several minutes, peel each pepper. Flatten whole peppers. Add ½ teaspoon of salt to each pint jar, if desired. Fill jars loosely with peppers and add fresh boiled water, leaving 1 inch of head space. Adjust the lids and process according to No. 11 on Table 1 or 2.

Potatoes

An average of 20 pounds is needed per canner load of 7 quarts; an average of 13 pounds is needed per canner load of 9 pints.

Quality: Select small to medium-size mature potatoes of ideal quality for cooking. Tubers stored below 45 F may discolor when canned. Choose potatoes 1 to 2 inches in diameter if they are to be packed whole.

Procedure: Wash and peel potatoes. Place is ascorbic acid solution to prevent darkening. If desired, cut into ½-inch cubes. Drain. Cook 2 minutes in boiling water and drain again. For whole potatoes, boil 10 minutes and drain. Add 1 teaspoon of salt per quart to the jar, if desired. Fill jars with hot prepared potatoes, leaving no more than 1-inch headspace. Cover hot potatoes with fresh boiling water, leaving 1-inch headspace and covering all pieces of potato. (Caution: Do not use the water you cooked the potatoes in; it contains too much starch.)

Pumpkin and Winter Squash – Cubed

An average of 2¼ pounds per quart

Quality: Pumpkins and squash should have a hard rind and stringless, mature pulp of ideal quality for cooking fresh. Small-sized pumpkins (sugar or pie varieties) make better products.

Procedure: Wash, remove the seeds, cut into 1-inch-wide slices and peel. Cut flesh into 1-inch cubes. Boil two minutes in water. Caution: Do not mash or puree. Fill jars with the cubes and cooking liquid, leaving 1 inch of head space. Adjust the lids and process according to No. 12 on Table 1 or 2.

For making pies, drain jars and strain or sieve the cubes.

Soups

Vegetable, dried beans or peas, meat, poultry or seafoods

Procedure: Select, wash and prepare vegetables, meat and seafoods as described for the specific foods. Cover meat with water and cook until tender. Cool the meat and remove the bones. Cook vegetables. For each cup of dried beans or peas, add 3 cups of water, boil two minutes, remove from the heat, soak one hour and heat to boiling. Drain and combine with meat broth, tomatoes or water to cover. Boil five minutes. Caution: Do not thicken before canning. Salt to taste, if desired. Fill jars halfway with solid mixture. Add remaining liquid, leaving 1 inch of head space. Adjust lids and process according to No. 13 on Table 1 or 2.

Cautions:

  • Process 100 minutes if the soup contains seafood.
  • Do not add noodles or other pasta, rice, flour, cream, milk or other thickening agents to home-canned soups.
  • If dried beans or peas are used, they must be fully rehydrated first.

Spinach and Other Greens

An average of 4 pounds per quart

Quality: Can only freshly harvested greens. Discard any wilted, discolored, diseased or insect-damaged leaves. Leaves should be tender and attractive in color.

Procedure: Wash only small amounts of greens at one time. Drain the water and continue rinsing until the water is clear and free of grit. Cut out tough stems and midribs. Place 1 pound of greens at a time in a cheesecloth bag or blancher basket and steam three to five minutes or until well wilted. Add ½ teaspoon of salt to each quart jar, if desired. Fill jars loosely with greens and add fresh boiling water, leaving 1 inch of head space. Adjust the lids and process according to No. 14 on Table 1 or 2.

Squash, Winter – Cubed

Prepare and process according to instructions for “Pumpkin.”

Recommended Process Times

Table 1. Recommneded process times in a dial-gauge pressure canner.
 

Style of Pack

Jar Size

Process Time

Canner Pressure (PSI) at Altitudes of

0-
2,000 ft.

2,001-
4,000 ft.

4,001-
6,000 ft.

6,001-
8,000 ft.

1. Asparagus

Hot and Raw

Pints

30 min.

11 lb.

12 lb.

13 lb.


Quarts

40 min.

11 lb.

12 lb.

13 lb.


2. Dried beans and peas

Hot

Pints

75 min.

11 lb.

12 lb.

13 lb.


Quarts

90 min.

11 lb.

12 lb.

13 lb.


3. Beans, dry, baked or with
tomato or molasses sauce

Hot

Pints

65 min.

11 lb.

12 lb.

13 lb.


Quarts

75 min.

11 lb.

12 lb.

13 lb.


4. Beans, snap and Italian

Hot and Raw

Pints

20 min.

11 lb.

12 lb.

13 lb.


Quarts

25 min.

11 lb.

12 lb.

13 lb.


5. Beets

Hot

Pints

30 min.

11 lb.

12 lb.

13 lb.


Quarts

35 min.

11 lb.

12 lb.

13 lb.


6. Carrots

Hot and Raw

Pints

25 min.

11 lb.

12 lb.

13 lb.


Quarts

30 min.

11 lb.

12 lb.

13 lb.


7. Corn, cream style

Hot

Pints

85 min.

11 lb.

12 lb.

13 lb.


8. Corn, whole kernel

Hot and Raw

Pints

55 min.

11 lb.

12 lb.

13 lb.


Quarts

85 min.

11 lb.

12 lb.

13 lb.


9. Mixed vegetables

Hot

Pints

75 min.

11 lb.

12 lb.

13 lb.


Quarts

90 min.

11 lb.

12 lb.

13 lb.


10. Peas

Hot and Raw

Pints or Quarts

40 min.

11 lb.

12 lb.

13 lb.


11. Peppers

Hot

Half-pints or Pints

35 min.

11 lb.

12 lb.

13 lb.


12. Potatoes

Hot

Pints

35 min.

11 lb.

12 lb.

13 lb.

14 lb.

Quarts

40 min.

12 lb.

12 lb.

13 lb.

14 lb.

13. Pumpkin and winter squash
– cubed

Hot

Pints

55 min.

11 lb.

12 lb.

13 lb.


Quarts

90 min.

11 lb.

12 lb.

13 lb.


14. Soups

Hot

Pints

60* min.

11 lb.

12 lb.

13 lb.


Quarts

75* min.

11 lb.

12 lb.

13 lb.


*Caution: Process 100 minutes if soup contains seafoods.

15. Spinach and other greens

Hot

Pints

70 min.

11 lb.

12 lb.

13 lb.


Quarts

90 min.

11 lb.

12 lb.

13 lb.

 
Table 2. Recommneded process times in a weighted-gauge pressure canner.
 

Style of Pack

Jar Size

Process Time

Canner Pressure (PSI) at Altitudes of

0-
1,000 ft.

Above
1,000 ft.

1. Asparagus

Hot and Raw

Pints

30 min.

10 lb.

15 lb.

Quarts

40 min.

10 lb.

15 lb.

2. Dried beans and peas

Hot

Pints

75 min.

10 lb.

15 lb.

Quarts

90 min.

10 lb.

15 lb.

3. Beans, dry, baked or with
tomato or molasses sauce

Hot

Pints

65 min.

10 lb.

15 lb.

Quarts

75 min.

10 lb.

15 lb.

4. Beans, snap and Italian

Hot and Raw

Pints

20 min.

10 lb.

15 lb.

Quarts

25 min.

10 lb.

15 lb.

5. Beets

Hot

Pints

30 min.

10 lb.

15 lb.

Quarts

35 min.

10 lb.

15 lb.

6. Carrots

Hot and Raw

Pints

25 min.

10 lb.

15 lb.

Quarts

30 min.

10 lb.

15 lb.

7. Corn, cream style

Hot

Pints

85 min.

10 lb.

15 lb.

8. Corn, whole kernel

Hot and Raw

Pints

55 min.

10 lb.

15 lb.

Quarts

85 min.

10 lb.

15 lb.

9. Mixed vegetables

Hot

Pints

75 min.

10 lb.

15 lb.

Quarts

90 min.

10 lb.

15 lb.

10. Peas

Hot and Raw

Pints or Quarts

40 min.

10 lb.

15 lb.

11. Peppers

Hot

Half-pints or Pints

35 min.

10 lb.

15 lb.

12. Potatoes

Hot

Pints

35 min.

10 lb.

15 lb.

Quarts

40 min.

10 lb.

15 lb.

13. Pumpkin and winter squash
– cubed

Hot

Pints

55 min.

10 lb.

15 lb.

Quarts

90 min.

10 lb.

15 lb.

14. Soups

Hot

Pints

60* min.

10 lb.

15 lb.

Quarts

75* min.

10 lb.

15 lb.

*Caution: Process 100 minutes if soup contains seafoods.

15. Spinach and other greens

Hot

Pints

70 min.

10 lb.

15 lb.

Quarts

90 min.

10 lb.

15 lb.

Adjust for Altitude

As altitudes increase, air becomes thinner, and this affects both pressures and boiling points in home canning. Using the water-bath process times for canning food at sea level may result in spoilage if you live at altitudes of 1,000 feet or more. Water boils at lower temperatures as altitude increases. Lower boiling temperatures are less effective for killing bacteria. Increasing the processing time or canner pressure compensates for lower boiling temperatures. Select the proper processing time and canner pressure for the altitude where you live.

The altitude in North Dakota varies from 800 feet above sea level in the east to 3,000 feet in the west. The map below shows the approximate altitude of areas of North Dakota.

North Dakota Elevation Map - Altitude in North Dakota varies from 800 feet above sea level in the east to 3000 feet in the west.

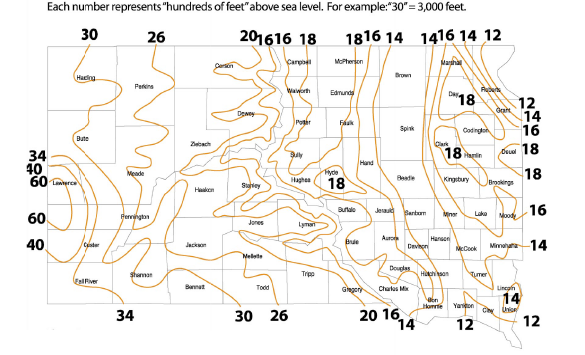
The altitude in South Dakota varies from 1,200 feet to 6,000 feet above sea level. The map below shows the approximate altitude of areas in South Dakota. 

South Dakota Elevation Map

 For more specific information regarding altitude in your county, contact your county Extension office.

 For more information on this and other topics, see www.ndsu.edu/food 

(Click on “Nutrition, Food Safety and Health” then “Food Preservation and Wild Game”)

Source: Based on “Complete Guide to Home Canning,” Agriculture Information Bulletin 539, 2009 revision, and information from the National Center for Home Food Preservation, University of Georgia, Athens, Ga.

The information given herein is for educational purposes only. Reference to commercial products or trade names is made with the understanding that no discrimination is intended and no endorsement by the Extension Service is implied.